Tuesday, May 30, 2023

Sniffing GSM traffic on a private cellphone network

Legal Disclaimer: GSM Research and Passive Traffic Monitoring

‘The information provided in this blog is for educational and informational purposes only. The author and publisher of this blog are not responsible for any misuse, illegal activities, or damages that may arise from the use of the information provided herein.


The author conducted research using two Samsung phones and a BladeRF with YateBTS to create a small-scale GSM network for the purpose of analyzing and intercepting traffic. It is important to note that intercepting or tampering with wireless communication without proper authorization is illegal in many jurisdictions. The author undertook this research within a controlled and lawful environment, and any techniques or findings described in this blog should not be replicated or applied in unauthorized or illegal activities.


The author strongly advises against engaging in any illegal activities, including but not limited to intercepting or tampering with wireless communications, without the express permission and authorization of the relevant authorities and stakeholders. Unauthorized interception of wireless communications violates privacy laws, regulations, and individual rights. Engaging in such activities may lead to severe legal consequences, including criminal charges and civil liabilities. It is always recommended to consult with legal professionals or authorized experts before conducting any research or experiments in the field of wireless communication.


The author disclaims any liability or responsibility for any damages, losses, or legal implications arising directly or indirectly from the use, misuse, or interpretation of the information provided in this blog.


By reading and using the information in this blog, you agree to the terms of this legal disclaimer and accept the risks associated with unauthorized interception or tampering with wireless communications.’


In this blog post I will be taking a look at cellular traffic and analyzing the GSM packets in Wireshark. However, I will also show how I have created a personal and portable, private cell phone network that I will use for this exercise. I created a portable cell phone network to ensure that I am operating and testing on frequencies that are not interfering or overlapping with any licensed operators in my area. I do not recommend that you attempt to follow along unless you understand how to properly do everything to stay within the bounds of your local laws, rules and regulations. It is illegal to interfere with licensed operators or to sniff the private traffic of individuals. To avoid these issues everything here is done in a private cell phone network I have created for this exercise with my own devices and cellular base station.

Here are some SIM cards that I programmed

The interface for programming the IMSI on the SIM cards was interesting to work with. You also need to specify a KI value as well for authentication . This will come up again when we discuss the Kc value for decoding later on in another post. Here we are going to passively observe gsm network traffic on our own portable cellphone network. The SMS and voice decoding is beyond the scope of this post as for now we will be discussing how to set up a base station, have cellular devices join the private network. Then I will demonstrate how you can have the devices call and text one another on your private cellphone network. Additionally, on another machine I will show how the traffic can be observed and analyzed with a HackRF, grgsm_livemon and Wireshark. I programmed the two SIM cards with 15 digit IMSI numbers to be compatible with the Yate base station. 


Here is the interface for writing IMSI and KI values to the custom SIM cards


Writing to a SIM card

Here is what the SIM card reader/writer looks like in action. It's useful for setting up the devices with the YateBTS as I have read that although you can perhaps have your base station freely adopt new subscribers within certain IMSI ranges that at least with the BladeRF there seems to be better performance if the base station is programmed to add specific subscribers with IMSI numbers that are put directly into the backend interface. I did this to get ahead of any connectivity issues and found that the connectivity and service worked quite well and consistently.


Loading the custom SIM cards

So at this point, the devices have been loaded with custom programmed SIM cards. They have the appropriate IMSI values needed for the Yate base station. Next I will show how I setup the base station before we get everything connected. I was able to run the YateBTS of a USB running DragonOS focal that has precompiled versions of the base station software that really helps to get up and running quickly. I flashed a USB with an ISO of the DragonOS focal software. Since it comes pre loaded with all the necessary files compiled and ready to roll thanks to ‘@cemaxecuter’ that helped cut down on setup time tremendously. I will show the GUI interface in a moment. Here is where we start the backend Apache server and load the FPGA files to the BladeRF.

Loading FPGA bitstream to the BladeRF

Since I created custom SIM cards I knew what the IMSI number was that I needed to put for the subscribers I wanted to add to my base station.

Adding subscribers manually with IMSI numbers

After a little bit more configuration in regards to the frequencies being used the BTS will be ready to start. You need to be careful to not transmit at frequencies that can interfere with licensed operators in your area. I chose to create a 2G network on frequencies that definitely are not overlapping with other devices in my area. Additionally also at run time I use an RF enclosure to ensure that my transmissions are not unintentionally affecting anyone else in my area.

There are quite a few steps to get up and running but we have basically everything we need at this point. We created custom SIM cards to put on our devices, we have configured our local base station and loaded the appropriate FPGA bitstream to the BladeRF. Since I want to also see what is going on I will also at this point setup the observing machine with the HackRF. For this purpose I setup another laptop with DragonOS software. I initially scanned the area to see my base station and then since I created the base station I already had the exact transmission frequency that would normally need to be found at this step. Using a tool called grgsm_livemon I am able to monitor a single channel at a time. I additionally started up Wireshark to start monitoring for the GSMTAP packets to be able to later analyze them and learn about the test portable cell phone network I have setup.

Now that the cellular base station is up and running as well and we have another machine observing the traffic and pulling it into Wireshark we are ready to have our devices join the network and see what they're doing in granular detail. Here my network has a generic name of 00101.

Selecting our custom network

Upon joining the network a test message is sent to the device alerting it that it has joined our special network and letting the user know what their new number is on our little private, portable network. For this device below it has now been allocated the phone number of '56789'. If another user needs to contact this user they would text or call '56789' on their device as you would normally dial or text anyone.

Joining the custom network

I decided to do a quick QA test on my network and tested to see if texts and calls were working properly. 

Texting devices on the network works
 
Also calls between devices across the network worked well. This is really cool because you can use cellphones on your own private network as you normally would use a much larger company such as AT&T, T-Mobile or Verizon. And best of all, it's free. The software is completely open source and there are no paid per use limits or any fees whatsoever. Once you are up and running you can use your private cell phone network on a private island or very large ranch to communicate privately with your friends on your own portable cell phone network. I found this to be a really neat project to work on and this is a lot of fun once I got it all setup and working properly. It also helps for security research as I can now investigate things on my own network, with my own devices on my own frequencies so that I am definitely not interfering with any systems, channels or frequencies I am not supposed to be. 

Our first call on our private, portable cellphone network 

And at this point we can definitely see the traffic flowing on our observation machine. As you can see below gr-gsm livemon is working well and is seeing everything from our base station and what is going on between our devices. 

gr-gsm livemon traffic 

gr-gsm livemon and Wireshark

Here is a packet from our private network 
Here we see the IMSI for one of our test devices

As you can see there is GSM packet with some system information above and below there is one with specific user IMSI information. The first packet shows our 'Unknown' network and a unique location area code that clearly does not really exist anywhere. In the packet below that we have been able to find an IMSI associated with one of our test devices. Additionally, below we see that with a tool called GSMEvil we are even able to intercept SMS messages in addition to being able to observe IMSIs. 

Viewing SMS messages on our own network with GSMEvil

I hope you have found this little deep dive into cellular traffic to be interesting and informative. It has been fun to learn how to create a private, portable cellphone network. Also, if you decide to try anything I have discussed above please be mindful of any local rules, laws or regulations. It is best to double check anything you are unsure about before you actually begin any testing, observing, monitoring or transmitting.

Saturday, July 10, 2021

What's a Pumpkin Honeypot and why you should probably be using a VPN when you're on free Wi-Fi

So to start off I repurposed the first honeypot I had created a couple of months ago.
This was quite similar to flashing the microSD the first time so I won't go into the details again. You can read more about Kali for Raspberry PI here. This is really cool because once you flash the Kali image onto the SSD with the addition of a battery pack you have now created a portable Kali machine that is ready to take with you on all sorts of adventures. Please remember to only test on things that you have permission to do so. An easy way is to just test against your own devices and I will show a few examples below of some fun things I found going a little deeper into my security research on Wi-Fi. So in the first honeypot I created before I had simple logging capabilities if a rogue device where to connect to my access point. I had at least a mac address and minimal information about the device. So that was interesting but I wanted to go a bit further and see what else you could do. I decided for this next example to not try and reinvent the wheel but rather to see what are some cool tools I could find to help me further understand how this whole Wi-Fi thing works more in depth. There are many tools to explore still but I found this one in particular to be very interesting. It is called WiFiPumpkin3 and you can take a look by grabbing a free copy over on github. They have done away with the graphical user interface which has given way to the command line based version. This makes its use slightly more technical but does allow for more granular control, automation and custom configurations.


And to start off you can name your WiFi any emoji you want which is fun. So now that I connected to the newly created access point nothing really seems off. I went and visited my website at jasongardner.us and started clicking around. Great, we were able to spin up a new wifi access point with the raspberry pi in a minute once wifipumpkin3 was loaded on the Raspberry Pi. However, that's not all that just happened. 


So within wifipumpkin3 there is 'sniffkin' which is sniffing the traffic flowing through the honeypot. Here the rogue access point we have created is now allowing devices to connect and browse the web but we are also logging what websites and IP addresses the device is connecting to. That's probably not what you expected when you were just connecting to a free Wi-Fi now is it. Here is another module within wifipumpkin3 that I thought was very interesting. Here this is creating a captive portal so when a device connects to the rogue access point users are greeted with a portal requesting a username and password. You may have seen this on a campus, hotel or even at a Starbucks. The danger here is that this page can be made to look like any login portal anywhere. So when users connect and enter their usernames and passwords then they are not putting those where they think they are. 


So here you see that the user has successfully logged into the captive portal on their iPhone. They have unwittingly entered their credentials on a fake login page to use the free Wi-Fi. 


As you can see this is just an example and the user 'Admin' with a a password of 'test' is logged in the system. Now the user will connect and not only have the credentials they use to access the local free wifi were logged then any subsequent internet browsing will be logged as well. Well, why am I telling you this? This all seems a bit troubling and makes me think that I shouldn't use free Wi-Fi anymore anywhere. I'm saying that more so that you can be aware of what's out there. I think that by being aware, you can take the proper steps to protect yourself and safeguard your usage of the internet and keep some of your privacy intact from attackers. Sometimes you have to think like an attacker to protect yourself from an attacker. So what can you do? Should you really just leave your phone off the next time you're at the airport or at a hotel? Of course not. Just use a VPN. A VPN will create a tunnel of sorts for your data to travel across the internet safely, securely and privately. All someone would be able to see even if they are sitting right there in the middle of your connection would be scrambled messages and that perhaps you are connecting to a VPN. I decided to investigate this a bit further to see how encrypted or protected my internet usage was with a VPN. Here I am using NordVPN on an iPhone. 

You can grab the latest version of Wireshark here. Wireshark allows you to analyze and look at network traffic. Here we are looking at the interface wlan0 which is the Wi-Fi interface where the rogue access point is broadcasting from. By looking at interface wlan0 we are able to see everything going to and from the iPhone and the honeypot. One unexpected thing I found here is that although most of my internet traffic was being routed through the VPN and was therefore encrypted not all app data was going through the VPN tunnel. In fact an observer could see that I'm also listening to music on Spotify. However, at least the important internet traffic like emails and banking are protected which is good. So although the VPN may not work 100% correctly all the time, you are getting an infinitely greater amount of privacy by using the VPN when traveling or visiting new places that you are unfamiliar with where there could be a rogue access point. Again, though to clarify you should not do this against devices you do not own or have the permission to test against. I am showing you this more as a warning of what is out there and why you should be careful when connecting to unknown Wi-Fi and to use a VPN whenever you can.


So is there anything else you can do. Yes, there is one more thing I thought of in this analysis that I don't think it would be complete without and that is - location. Yes, what is the real point of detecting a nefarious device that is connecting if you are then not able to localize yet. Find it? How, it is invisible? Not really. I found another very interesting tool for android phones. This doesn't exist for iOS yet, but I hope that is in the works somewhere. This app is called WiGLE WIFI Wardriving. With this app using the phones GPS and maps we are able to do wireless site surveys that show us precisely where a device is based on an SSID or mac address. This can even help you locate Bluetooth devices. So here I wanted to confirm that my device was indeed correctly connected to the Wi-Fi honeypot and the location is correct and I can confirm I'm connected to the right device. This can also be used to find the device by mac address that was initially logged in our first honeypot. So we have also gone a layer deeper with the wireless site surveys and can now not only identify nefarious devices that have connected but we have a way of finding the location of the devices.


Thursday, March 18, 2021

Raspberry Pi WiFi Honeypot 🍯

This was a fun project to work on and build out. I learned a few new interesting tricks along the way. I started with this tutorial from 2013 by Andy Smith. However, a few things have changed with hostapd that I had to figure out through debugging. Also, the configuration of the nginx server as well as dnsmasq were slightly different for me using the new Raspbian Buster for Raspberry Pi 4.  This should save you some time if you follow my trick tips later on in the article that I found by searching through various message boards and googling error messages as I did debugging to get this working properly.

I have gone over setting up nginx servers in previous articles so if you need help with getting started these may be helpful.

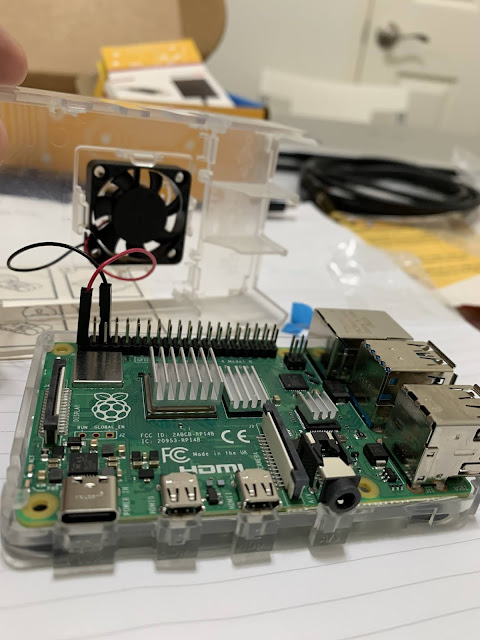
So first things first. I started with a canakit and assembled the raspberry pi with the appropriate heat sinks and a little fan set to a standard speed. The speed is adjusted by how you install the wiring. If you haven't done this before you can follow the manufacturers documentation to get rolling with that.


Assembling the Raspberry Pi
Assembling the Raspberry Pi. Hardware assembly is fun if you like puzzles :).

Next I flashed the micro SD card with Raspbian Buster which is the operating system that will be on this tiny computer. I used a little adapter and balenaEtcher on a mac to flash the micro SD card. This is pretty straight forward so I won't go into the details since there are plenty of easy tutorials to do this part.

Success! The card is flashed and we are ready for the next steps.

At this point I went ahead and added a WiFi dongle that can support running as an access point. Additionally for configuring I went ahead and plugged in a keyboard and mouse with a usb hub so now this is looking very cyberpunk but I promise this will be easy and very efficient as we go along further.


Now I did this project over two separate nights so the additional step here is that you will need to briefly connect this to an ethernet cable to grab a few things. Eventually this is not connected to ethernet so we can have a truly sandboxed wifi honeypot that is not connected to the internet and is merely to log attacker activity and attempted access. I plugged in the ethernet cable and grabbed hostapd, nginx, and dnsmasq.

The honeypot at a high level is a simple but quite interesting concept. We will spin up an access point with hostapd that can be joined from a phone or laptop. Here I called the honeypot network 'decepticonNetwork'. Then with a neat little trick dnsmasq will now redirect all requests to our local nginx server which is serving up the little warning page. Getting hostapd up and running is not as easy as it was before but it is more for security that it does not come unmasked out the box so to speak. Through the command line I ran commands to unmask, enable and start and it finally connected properly to both a laptop and a phone.


Now you can configure the nginx server to do anything you want when the device that illicitly connected to our untrusted network tries to access a webpage. I redirected all web requests to my nginx server using dnsmasq. So now after connecting to 'decepticonNetwork' if I type in any url like somerandomurl.com or blaaaaargh.com my nginx warning page gets served up. 


Also a fun extra here is that now all users who access the WiFi honeypot are now logged in a dnsmasq.log file for later analysis and review. This was a fun learning experience. Obviously this is just the beginning as you can then get a lot more advanced with your logging and blue team analysis and defense. However, this is a great introductory start to the world of WiFi honeypots and cyber defense.

Thursday, December 3, 2020

Hack The Box - Swagshop - CTF writeup


So in preparation for the OSCP and to get better at understanding security vulnerabilities I have been doing what are commonly referred to as capture the flag challenges. Here I will go over a unique vulnerability that allows remote access to a "user.txt" file and a "root.txt" file. The root.txt file can only be acquired remotely if I can gain remote command execution as the root or system user. Since this is a Linux based system I will be trying to escalate my privileges up to root so I can control the system and do the file retrieval. 

The biggest and initial step is enumeration. So far I just know there is a box with an IPv4 address of 10.10.10.140. From the name I can assume perhaps that this is a shop of some kind but that is all the initial information given. In essence this CTF is mirroring what you would refer to as black box testing in a security or penetration testing job. Here perhaps a shop owner is concerned about their security and would like to see what if anything bad could happen if an attacker targeted their site so they can know what to patch or fix ASAP. Let's proceed with initial enumeration. I'll start with Nmap.


The initial Nmap scan reveals a common setup. There are two ports open. The service known as ssh or secure shell is open on port 22 which is operating with the tcp or transmission control protocol and is using OpenSSH 7.2p2. This allows an admin to remotely control the machine but without a password I would have to check the version to see if it is a vulnerable or patched version. Next I see that port 80 is open running from an Apache/2.4.18 Ubuntu server. 


Well that is rather strange. Our initial scan revealed what appears to be a common web server but we are unable to connect on port 80. Perhaps let me try some DNS rebinding by adding this IPv4 address to my etc/hosts files so my local machine will resolve to the proper address.

 
It is still not loading. To double check to see if there is data and that it's not an issue from how I am browsing I like to get manual and use the command line. I used a simple cURL request to see the page.


Nice, now we are getting somewhere. This looks more like what I was expecting to be hosted on port 80. There is a webpage and I can see the store is running Magento and we are indeed looking at an e-commerce site. 

It was a proxy issue I needed to configure this since in the background I am also using burpsuite to intercept and analyze requests. This just basically means I am routing all the traffic from the site through this tool that allows for more manual analysis and testing.


Sometimes, trial and error is the best teacher. So in fact the site was actually not resolving because I was going to https://10.10.10.140 and not http://10.10.10.140. Since this is for practice the site does not have proper security certificates and therefore when trying to access via https the web browser by default tries to access port 443 which is unavailable. A request in a browser to http goes to port 80 which is open and now here we are at the store. 


Now when I go to see the login page I see an interesting behavior in how the server is handling the request. It is common to see a login just served from a web root directory but here I see that there are path parameters in the URL which for a Magento site makes sense since these links are interacting with a database on the backend. So the URL I get sent to when I attempt to login is: 
http://10.10.10.140/index.php/customer/account/login/. The index.php before the /customer/account/login is of particular interest. Let's keep that in our notes and move forward. 

I now want to see what else is on this server so I will use "gobuster" as follows: 


Ok, /app with a 301 is interesting to me so I went and explored that folder. Within it I found /etc/local.xml. This config file has an install date and a key so I'll add that to my notes because keys are usually important if you find them lying around.


Also, the site is using Mage with a copyright date of 2008. Let's check the site to see what version of Magento they are running. Wow, just as I suspected they are running a very old version of Magento. This store is being setup with a 2014 version of Magento. It is always important to use the latest versions of software to have the latest patches against dangerous vulnerabilities. This got me thinking I should perhaps see if I don't have to reinvent the wheel here. Ok, this is good, there appear to be quite a few exploits within Metasploit for Magento. Perhaps what we are looking for already exists which will make this engagement a lot easier than having to code some exploits from scratch. The one that first stands out in the list of potential exploits is the authenticated remote code execution. However we will have to create an admin user to use that one. Upon doing some quick googling I come to find that there is also an exploit that allows me to create an admin user. Perfect. So this will be two steps to get the initial shell. I will have to create an admin account I can use and then run the following exploit with authenticated credentials to have the remote machine connect back to my testing(attacker) box. Here below I am looking at the exploit to create a new admin user. A few points to note are that the default username:password combination will now be forme:forme. In a real penetration test or red team engagement from a public IP you would want to change this to be secure so an attacker from the outside doesn't inadvertently use the backdoor you have just created. Here I am just on a VPN and this is a practice box so this is fine. Also, upon trying to navigate to the /admin/Cms_Wysiwyg/directive/index/ directory I see that this is not allowed. 


Well this is rather strange. The directory in the exploit doesn't seem to be accessible in this version of Magento on this particular Apache server. This is going to create a big problem because without that working we won't be able to create the new admin account. But then I remembered something critical. 


Do you remember the path parameters from the initial reconnaissance? I tried including index.php before the directory in the url being requested in the exploit and am now granted access to an admin panel. This is great because now that we have a path to access the admin panel we can attempt to run the exploit without it just getting 403 errors from the server. 

Ok, so here is a quick overview of the python exploit code I will run against this Magento server. Like I said before you would want to modify the password for security on a real red team engagement. However, here for the purpose of this exercise I am going to just set the target URL and include the path parameter of /index.php. 


Now it's time for the rubber to meet the road. Let's see if this exploit works.


Excellent! The exploit worked and the first piece of this puzzle is finally falling into place. Let's test it out. We are now successfully logged in as user "forme". There used to be another exploit that could be run within this panel but it has been patched on this version of Magento. So for now let's log out and return to the authenticated RCE code we had seen above now that we have a way for the program to authenticate with our newly created admin credentials. 


Now I will move onto the other python exploit and see what needs to be modified for this particular scenario. Interestingly enough it looks like there is a php function with an argument of 'system' which will allow for the code execution. I configured it with the newly created credentials. And this highlights the importance of reconnaissance in addition to good note taking. I need the exact install date but I have that from the xml file I had found at the beginning in that /app folder. Perfect, this is the missing piece that this exploit needs to work against this particular version of Magento. The exact date and time of install are needed to proceed. Here below you can see how I modified the code:


Well, that is not what was expected. It doesn't run and python is giving some error about no control matching. I see that the module being used in mechanize so I assume there are some issues with the automated requests being sent by this headless browser of sorts. 


Unfortunately, that wasn't it. I tried a few variations of the url, included the /index.php and /admin which seems to have solved that problem. Very cool. I don't want to get into all the debugging details but suffice it to say there were a few more variations to get this code running with the newer version of mechanize than when this box was first created. However, moving forward, when I tested with the system command of 'whoami' I see that I am getting remote code execution on this system as 'www-data'. This is good because now I can see if I can establish a foothold with a shell even if it is a low level shell like the one assigned to www-data. For good measure I want to make sure the script is executing on the server correctly so I try to retrieve the /etc/passwd file. 


This is great because at this point I am able to do remote code execution on the remote machine. Now to have more control and possibly escalate my privileges I will need an initial shell which is an interactive prompt that allows me to control the machine remotely. I setup a simple netcat listener but had trouble. The issue was that it seems that a firewall was blocking all my attempts except on port 443. There was also something particular with the bash nesting for this to work. However, as you can see in the screenshots below I got the first shell and was able to upgrade it to a proper shell using "python3 -c 'import pty;pty.spawn("/bin/bash")'. Then you pause the session, modify it and return to an interactive prompt that now allows more editing without freezing or hanging.


At this point this solves the first challenge and from here it's a matter of just navigating to the user's desktop. In this case the user is named 'haris' and the 'user.txt' file is on their desktop. 


Now from the output above when checking for sudo privileges I see that this user has access to run /usr/bin/vi and appears to have wildcard editing access on /var/www/html/*.  I go ahead and open index.php in vi which is a process that I am now running as root. I then, instead of doing :wq! to exit do :!/bin/bash and I am dropped right into the root user's command prompt with full system control and privileges.


From here it is a matter of just navigating to the correct folder to retrieve the 'root.txt' flag. This was a fun box with some tricky little challenges in regards to path parameters in the url, python module debugging and finally an interesting privilege escalation at the end there. I have been learning a lot doing these challenges and I find that there are few things as exciting as getting to be "root".


Tuesday, June 9, 2020

PHP - Sending e-mail data from a server's localhost


This is a fun example I created from following some tutorials on YouTube. I have built SMTP servers in previous examples, but this can be used to send e-mails from a webpage to a server for contracts or something as simple as a guestbook where an admin would like to have a system send automated e-mails to marketing, sales or management teams.

I used the PHPMailer library found on GitHub for the backend processing. For the front page I just made a simple form where the user can send a resume to a recruiter.


And don't worry this won't just let you put any name in the email text box. The e-mails need to come from a legitimate source such as the secured website where this will be hosted in production. The above was rendered from the code below. Nothing fancy here, just a simple form for submitting attachments. 


Success! The form works as intended and I got the test e-mail in my Gmail inbox from my test server.


Sniffing GSM traffic on a private cellphone network

Legal Disclaimer: GSM Research and Passive Traffic Monitoring ‘The information provided in this blog is for educational and informational pu...