This was a fun project to work on and build out. I learned a few new interesting tricks along the way. I started with this tutorial from 2013 by Andy Smith. However, a few things have changed with hostapd that I had to figure out through debugging. Also, the configuration of the nginx server as well as dnsmasq were slightly different for me using the new Raspbian Buster for Raspberry Pi 4. This should save you some time if you follow my trick tips later on in the article that I found by searching through various message boards and googling error messages as I did debugging to get this working properly.
I have gone over setting up nginx servers in previous articles so if you need help with getting started these may be helpful.
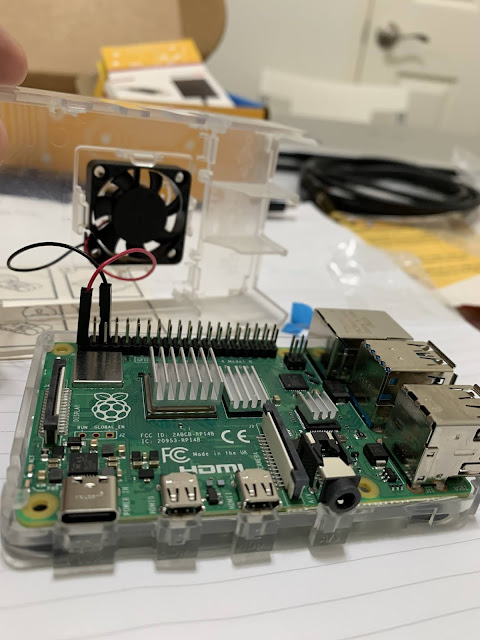
So first things first. I started with a canakit and assembled the raspberry pi with the appropriate heat sinks and a little fan set to a standard speed. The speed is adjusted by how you install the wiring. If you haven't done this before you can follow the manufacturers documentation to get rolling with that.
Assembling the Raspberry Pi. Hardware assembly is fun if you like puzzles :).
Next I flashed the micro SD card with Raspbian Buster which is the operating system that will be on this tiny computer. I used a little adapter and balenaEtcher on a mac to flash the micro SD card. This is pretty straight forward so I won't go into the details since there are plenty of easy tutorials to do this part.
 |
Success! The card is flashed and we are ready for the next steps.
|
At this point I went ahead and added a WiFi dongle that can support running as an access point. Additionally for configuring I went ahead and plugged in a keyboard and mouse with a usb hub so now this is looking very cyberpunk but I promise this will be easy and very efficient as we go along further.

Now I did this project over two separate nights so the additional step here is that you will need to briefly connect this to an ethernet cable to grab a few things. Eventually this is not connected to ethernet so we can have a truly sandboxed wifi honeypot that is not connected to the internet and is merely to log attacker activity and attempted access. I plugged in the ethernet cable and grabbed hostapd, nginx, and dnsmasq.
The honeypot at a high level is a simple but quite interesting concept. We will spin up an access point with hostapd that can be joined from a phone or laptop. Here I called the honeypot network 'decepticonNetwork'. Then with a neat little trick dnsmasq will now redirect all requests to our local nginx server which is serving up the little warning page. Getting hostapd up and running is not as easy as it was before but it is more for security that it does not come unmasked out the box so to speak. Through the command line I ran commands to unmask, enable and start and it finally connected properly to both a laptop and a phone.
Now you can configure the nginx server to do anything you want when the device that illicitly connected to our untrusted network tries to access a webpage. I redirected all web requests to my nginx server using dnsmasq. So now after connecting to 'decepticonNetwork' if I type in any url like somerandomurl.com or blaaaaargh.com my nginx warning page gets served up.
Also a fun extra here is that now all users who access the WiFi honeypot are now logged in a dnsmasq.log file for later analysis and review. This was a fun learning experience. Obviously this is just the beginning as you can then get a lot more advanced with your logging and blue team analysis and defense. However, this is a great introductory start to the world of WiFi honeypots and cyber defense.


somerandomurl.com - hee hee, that's me!
ReplyDeleteHave a USB wifi AP and a couple spare Pi - might have to give this a go.